
Echelle Gratings
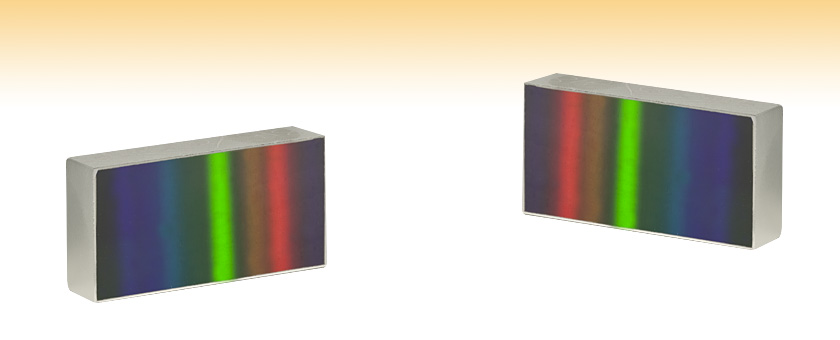
- Low Period Gratings for Use in Higher Orders
- Ideal for High Resolution Spectroscopy
- Typical Resolutions are 80% to 90% of Theoretical
GE2550-3263
GE2550-0363
(25 mm x 50 mm x 9.5 mm)
OVERVIEW
| Selection Guide | |
|---|---|
| Transmission Gratings | |
| Ruled | UV |
| Visible | |
| Near IR | |
| Volume Phase Holographic |
Visible |
| Near IR | |
| Reflective Gratings | |
| Ruled | UV |
| Visible | |
| Near IR | |
| Mid IR | |
| Holographic | |
| Echelle | |
| Common Specifications | |
|---|---|
| Substrate | Float Glass or Pyrex |
| Thickness (Typical) | 9.5 mm |
| Dimensional Tolerance | ±0.5 mm |
| Thickness Tolerance | ±0.5 mm |
| Damage Threshold | Pulsed: 350 mJ/cm2 @ 200 ns (10.6 µm) CW: 40 W/cm2 (10.6 µm) |
Features
- Low Period Reflective Gratings for Use in Higher Orders
- Ideal for High Resolution Spectroscopy
- Typical Resolutions are 80% to 90% of Theoretical
- Bare Aluminum Reflective Coating
- Substrate: Float Glass or Pyrex
High-Resolution Echelle Gratings are special low period reflective gratings designed for use in the high orders. They are generally used with a second grating or prism to separate overlapping diffracted orders. These gratings also feature high blaze angles making them an ideal solution for high-resolution spectroscopy. Supplied on precision glass substrates, Echelles have a resolution of 80-90% of the theoretical value. For information on selecting the right type of grating for your application, please see the Gratings Guide tab above.

Click to Enlarge
Diffraction Grating Mounted in Polaris Mirror Mount Using Diffraction Grating Adapter
Mounts and Adapters
Thorlabs offers a variety of mounts and adapters for precise and stable mounting and aligning of square optics. All of Thorlabs' gratings can be mounted directly into the KM100C Right-Handed or KM100CL Left-Handed Kinematic Rectangular Optic Mount. Gratings can also be mounted in one of three Kinematic Grating Mount Adapters which can be used with any of Thorlabs' Ø1" Mirror Mounts, including the POLARIS-K1E Ultra-Stable Kinematic Mirror Mount.
Warning:
The surface of a diffraction grating can be easily damaged by fingerprints, aerosols, moisture or the slightest contact with any abrasive material. Gratings should only be handled when necessary and always held by the sides. Latex gloves or a similar protective covering should be worn to prevent oil from fingers from reaching the grating surface. No attempt should be made to clean a grating other than blowing off dust with clean, dry air or nitrogen. Solvents will likely damage the grating's surface.
Thorlabs uses a clean room facility for assembly of gratings into mechanical setups. If your application requires integrating the grating into a sub-assembly or a setup please contact us to learn more about our assembly capabilities.
ECHELLE
Special Considerations with Echelle Gratings

The Grating Equation: The general grating equation may be written as: nλ = d(sin θ + sin θ') where n is the order of diffraction, λ is the diffracted wavelength, d is the grating constant (the distance between grooves), θ is the angle of incidence measured from the normal and θ' is the angle of diffraction measured from the normal.
Free Spectral Range: Free spectral range is the maximum spectral bandwidth that can be obtained in a specified order without spectral interference (overlap) from adjacent orders. As grating spacing decreases, the free spectral range increases. It decreases with higher orders. If λ1 and λ2 are lower and upper limits, respectively, of the band of interest, then:
Free Spectral Range = λ2 - λ1 = λ1/n
Using an Echelle Grating: The extremely high blaze angle of the Echelle grating concentrates the energy in the higher orders. In the simplest case where light is incident on the grating at an angle of 0° the grating equation simplifies to nλ = d sin θ' and if solved for sin θ' it becomes:
sin θ' = nλ / d
From this it follows that in higher orders the angular separation between two wavelengths becomes greater. Imagine two lines, one at 600 nm and the other at 605 nm, incident on a grating with 31.6 lines/mm. From the equation above, at n=1 the angular separation is 0.009° but at n=40 the angular separation 0.6°. The disadvantage is the reduced free spectral range, which decreased from 630 nm (630 nm/1) to 15.8 nm (630 nm/40). Often a dispersing prism is used in combination with an Echelle grating for order sorting.
DAMAGE THRESHOLDS
| Damage Threshold Specifications | |
|---|---|
| Item # Prefix | Damage Threshold |
| GE2550 | Pulsed: 350 mJ/cm2 @ 200 ns (10.6 µm) CW: 40 W/cm2 (10.6 µm) |
Damage Threshold Data for Thorlabs' Echelle Gratings
The specifications to the right are measured data for Thorlabs' Echelle Diffraction Gratings.
Laser Induced Damage Threshold Tutorial
The following is a general overview of how laser induced damage thresholds are measured and how the values may be utilized in determining the appropriateness of an optic for a given application. When choosing optics, it is important to understand the Laser Induced Damage Threshold (LIDT) of the optics being used. The LIDT for an optic greatly depends on the type of laser you are using. Continuous wave (CW) lasers typically cause damage from thermal effects (absorption either in the coating or in the substrate). Pulsed lasers, on the other hand, often strip electrons from the lattice structure of an optic before causing thermal damage. Note that the guideline presented here assumes room temperature operation and optics in new condition (i.e., within scratch-dig spec, surface free of contamination, etc.). Because dust or other particles on the surface of an optic can cause damage at lower thresholds, we recommend keeping surfaces clean and free of debris. For more information on cleaning optics, please see our Optics Cleaning tutorial.
Testing Method
Thorlabs' LIDT testing is done in compliance with ISO/DIS 11254 and ISO 21254 specifications.
First, a low-power/energy beam is directed to the optic under test. The optic is exposed in 10 locations to this laser beam for 30 seconds (CW) or for a number of pulses (pulse repetition frequency specified). After exposure, the optic is examined by a microscope (~100X magnification) for any visible damage. The number of locations that are damaged at a particular power/energy level is recorded. Next, the power/energy is either increased or decreased and the optic is exposed at 10 new locations. This process is repeated until damage is observed. The damage threshold is then assigned to be the highest power/energy that the optic can withstand without causing damage. A histogram such as that below represents the testing of one BB1-E02 mirror.
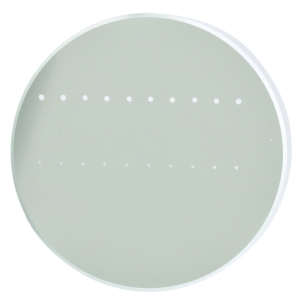
The photograph above is a protected aluminum-coated mirror after LIDT testing. In this particular test, it handled 0.43 J/cm2 (1064 nm, 10 ns pulse, 10 Hz, Ø1.000 mm) before damage.
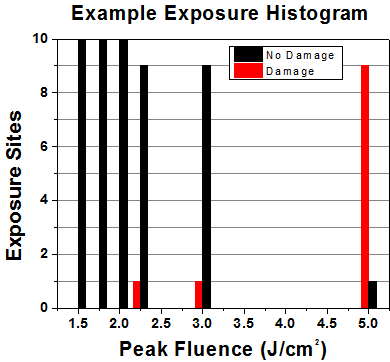
| Example Test Data | |||
|---|---|---|---|
| Fluence | # of Tested Locations | Locations with Damage | Locations Without Damage |
| 1.50 J/cm2 | 10 | 0 | 10 |
| 1.75 J/cm2 | 10 | 0 | 10 |
| 2.00 J/cm2 | 10 | 0 | 10 |
| 2.25 J/cm2 | 10 | 1 | 9 |
| 3.00 J/cm2 | 10 | 1 | 9 |
| 5.00 J/cm2 | 10 | 9 | 1 |
According to the test, the damage threshold of the mirror was 2.00 J/cm2 (532 nm, 10 ns pulse, 10 Hz, Ø0.803 mm). Please keep in mind that these tests are performed on clean optics, as dirt and contamination can significantly lower the damage threshold of a component. While the test results are only representative of one coating run, Thorlabs specifies damage threshold values that account for coating variances.
Continuous Wave and Long-Pulse Lasers
When an optic is damaged by a continuous wave (CW) laser, it is usually due to the melting of the surface as a result of absorbing the laser's energy or damage to the optical coating (antireflection) [1]. Pulsed lasers with pulse lengths longer than 1 µs can be treated as CW lasers for LIDT discussions.
When pulse lengths are between 1 ns and 1 µs, laser-induced damage can occur either because of absorption or a dielectric breakdown (therefore, a user must check both CW and pulsed LIDT). Absorption is either due to an intrinsic property of the optic or due to surface irregularities; thus LIDT values are only valid for optics meeting or exceeding the surface quality specifications given by a manufacturer. While many optics can handle high power CW lasers, cemented (e.g., achromatic doublets) or highly absorptive (e.g., ND filters) optics tend to have lower CW damage thresholds. These lower thresholds are due to absorption or scattering in the cement or metal coating.
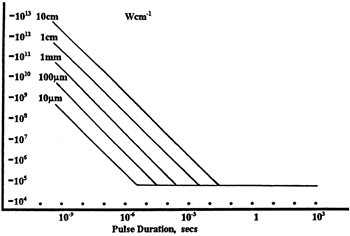
LIDT in linear power density vs. pulse length and spot size. For long pulses to CW, linear power density becomes a constant with spot size. This graph was obtained from [1].
Pulsed lasers with high pulse repetition frequencies (PRF) may behave similarly to CW beams. Unfortunately, this is highly dependent on factors such as absorption and thermal diffusivity, so there is no reliable method for determining when a high PRF laser will damage an optic due to thermal effects. For beams with a high PRF both the average and peak powers must be compared to the equivalent CW power. Additionally, for highly transparent materials, there is little to no drop in the LIDT with increasing PRF.
In order to use the specified CW damage threshold of an optic, it is necessary to know the following:
- Wavelength of your laser
- Beam diameter of your beam (1/e2)
- Approximate intensity profile of your beam (e.g., Gaussian)
- Linear power density of your beam (total power divided by 1/e2 beam diameter)
Thorlabs expresses LIDT for CW lasers as a linear power density measured in W/cm. In this regime, the LIDT given as a linear power density can be applied to any beam diameter; one does not need to compute an adjusted LIDT to adjust for changes in spot size, as demonstrated by the graph to the right. Average linear power density can be calculated using the equation below.

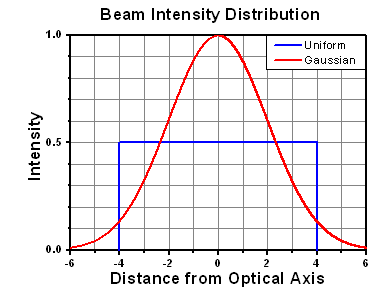
The calculation above assumes a uniform beam intensity profile. You must now consider hotspots in the beam or other non-uniform intensity profiles and roughly calculate a maximum power density. For reference, a Gaussian beam typically has a maximum power density that is twice that of the uniform beam (see lower right).
Now compare the maximum power density to that which is specified as the LIDT for the optic. If the optic was tested at a wavelength other than your operating wavelength, the damage threshold must be scaled appropriately. A good rule of thumb is that the damage threshold has a linear relationship with wavelength such that as you move to shorter wavelengths, the damage threshold decreases (i.e., a LIDT of 10 W/cm at 1310 nm scales to 5 W/cm at 655 nm):

While this rule of thumb provides a general trend, it is not a quantitative analysis of LIDT vs wavelength. In CW applications, for instance, damage scales more strongly with absorption in the coating and substrate, which does not necessarily scale well with wavelength. While the above procedure provides a good rule of thumb for LIDT values, please contact Tech Support if your wavelength is different from the specified LIDT wavelength. If your power density is less than the adjusted LIDT of the optic, then the optic should work for your application.
Please note that we have a buffer built in between the specified damage thresholds online and the tests which we have done, which accommodates variation between batches. Upon request, we can provide individual test information and a testing certificate. The damage analysis will be carried out on a similar optic (customer's optic will not be damaged). Testing may result in additional costs or lead times. Contact Tech Support for more information.
Pulsed Lasers
As previously stated, pulsed lasers typically induce a different type of damage to the optic than CW lasers. Pulsed lasers often do not heat the optic enough to damage it; instead, pulsed lasers produce strong electric fields capable of inducing dielectric breakdown in the material. Unfortunately, it can be very difficult to compare the LIDT specification of an optic to your laser. There are multiple regimes in which a pulsed laser can damage an optic and this is based on the laser's pulse length. The highlighted columns in the table below outline the relevant pulse lengths for our specified LIDT values.
Pulses shorter than 10-9 s cannot be compared to our specified LIDT values with much reliability. In this ultra-short-pulse regime various mechanics, such as multiphoton-avalanche ionization, take over as the predominate damage mechanism [2]. In contrast, pulses between 10-7 s and 10-4 s may cause damage to an optic either because of dielectric breakdown or thermal effects. This means that both CW and pulsed damage thresholds must be compared to the laser beam to determine whether the optic is suitable for your application.
| Pulse Duration | t < 10-9 s | 10-9 < t < 10-7 s | 10-7 < t < 10-4 s | t > 10-4 s |
|---|---|---|---|---|
| Damage Mechanism | Avalanche Ionization | Dielectric Breakdown | Dielectric Breakdown or Thermal | Thermal |
| Relevant Damage Specification | No Comparison (See Above) | Pulsed | Pulsed and CW | CW |
When comparing an LIDT specified for a pulsed laser to your laser, it is essential to know the following:
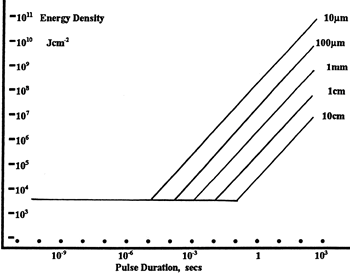
LIDT in energy density vs. pulse length and spot size. For short pulses, energy density becomes a constant with spot size. This graph was obtained from [1].
- Wavelength of your laser
- Energy density of your beam (total energy divided by 1/e2 area)
- Pulse length of your laser
- Pulse repetition frequency (prf) of your laser
- Beam diameter of your laser (1/e2 )
- Approximate intensity profile of your beam (e.g., Gaussian)
The energy density of your beam should be calculated in terms of J/cm2. The graph to the right shows why expressing the LIDT as an energy density provides the best metric for short pulse sources. In this regime, the LIDT given as an energy density can be applied to any beam diameter; one does not need to compute an adjusted LIDT to adjust for changes in spot size. This calculation assumes a uniform beam intensity profile. You must now adjust this energy density to account for hotspots or other nonuniform intensity profiles and roughly calculate a maximum energy density. For reference a Gaussian beam typically has a maximum energy density that is twice that of the 1/e2 beam.
Now compare the maximum energy density to that which is specified as the LIDT for the optic. If the optic was tested at a wavelength other than your operating wavelength, the damage threshold must be scaled appropriately [3]. A good rule of thumb is that the damage threshold has an inverse square root relationship with wavelength such that as you move to shorter wavelengths, the damage threshold decreases (i.e., a LIDT of 1 J/cm2 at 1064 nm scales to 0.7 J/cm2 at 532 nm):

You now have a wavelength-adjusted energy density, which you will use in the following step.
Beam diameter is also important to know when comparing damage thresholds. While the LIDT, when expressed in units of J/cm², scales independently of spot size; large beam sizes are more likely to illuminate a larger number of defects which can lead to greater variances in the LIDT [4]. For data presented here, a <1 mm beam size was used to measure the LIDT. For beams sizes greater than 5 mm, the LIDT (J/cm2) will not scale independently of beam diameter due to the larger size beam exposing more defects.
The pulse length must now be compensated for. The longer the pulse duration, the more energy the optic can handle. For pulse widths between 1 - 100 ns, an approximation is as follows:

Use this formula to calculate the Adjusted LIDT for an optic based on your pulse length. If your maximum energy density is less than this adjusted LIDT maximum energy density, then the optic should be suitable for your application. Keep in mind that this calculation is only used for pulses between 10-9 s and 10-7 s. For pulses between 10-7 s and 10-4 s, the CW LIDT must also be checked before deeming the optic appropriate for your application.
Please note that we have a buffer built in between the specified damage thresholds online and the tests which we have done, which accommodates variation between batches. Upon request, we can provide individual test information and a testing certificate. Contact Tech Support for more information.
[1] R. M. Wood, Optics and Laser Tech. 29, 517 (1998).
[2] Roger M. Wood, Laser-Induced Damage of Optical Materials (Institute of Physics Publishing, Philadelphia, PA, 2003).
[3] C. W. Carr et al., Phys. Rev. Lett. 91, 127402 (2003).
[4] N. Bloembergen, Appl. Opt. 12, 661 (1973).
LIDT CALCULATIONS
In order to illustrate the process of determining whether a given laser system will damage an optic, a number of example calculations of laser induced damage threshold are given below. For assistance with performing similar calculations, we provide a spreadsheet calculator that can be downloaded by clicking the button to the right. To use the calculator, enter the specified LIDT value of the optic under consideration and the relevant parameters of your laser system in the green boxes. The spreadsheet will then calculate a linear power density for CW and pulsed systems, as well as an energy density value for pulsed systems. These values are used to calculate adjusted, scaled LIDT values for the optics based on accepted scaling laws. This calculator assumes a Gaussian beam profile, so a correction factor must be introduced for other beam shapes (uniform, etc.). The LIDT scaling laws are determined from empirical relationships; their accuracy is not guaranteed. Remember that absorption by optics or coatings can significantly reduce LIDT in some spectral regions. These LIDT values are not valid for ultrashort pulses less than one nanosecond in duration.

A Gaussian beam profile has about twice the maximum intensity of a uniform beam profile.
CW Laser Example
Suppose that a CW laser system at 1319 nm produces a 0.5 W Gaussian beam that has a 1/e2 diameter of 10 mm. A naive calculation of the average linear power density of this beam would yield a value of 0.5 W/cm, given by the total power divided by the beam diameter:

However, the maximum power density of a Gaussian beam is about twice the maximum power density of a uniform beam, as shown in the graph to the right. Therefore, a more accurate determination of the maximum linear power density of the system is 1 W/cm.
An AC127-030-C achromatic doublet lens has a specified CW LIDT of 350 W/cm, as tested at 1550 nm. CW damage threshold values typically scale directly with the wavelength of the laser source, so this yields an adjusted LIDT value:

The adjusted LIDT value of 350 W/cm x (1319 nm / 1550 nm) = 298 W/cm is significantly higher than the calculated maximum linear power density of the laser system, so it would be safe to use this doublet lens for this application.
Pulsed Nanosecond Laser Example: Scaling for Different Pulse Durations
Suppose that a pulsed Nd:YAG laser system is frequency tripled to produce a 10 Hz output, consisting of 2 ns output pulses at 355 nm, each with 1 J of energy, in a Gaussian beam with a 1.9 cm beam diameter (1/e2). The average energy density of each pulse is found by dividing the pulse energy by the beam area:

As described above, the maximum energy density of a Gaussian beam is about twice the average energy density. So, the maximum energy density of this beam is ~0.7 J/cm2.
The energy density of the beam can be compared to the LIDT values of 1 J/cm2 and 3.5 J/cm2 for a BB1-E01 broadband dielectric mirror and an NB1-K08 Nd:YAG laser line mirror, respectively. Both of these LIDT values, while measured at 355 nm, were determined with a 10 ns pulsed laser at 10 Hz. Therefore, an adjustment must be applied for the shorter pulse duration of the system under consideration. As described on the previous tab, LIDT values in the nanosecond pulse regime scale with the square root of the laser pulse duration:

This adjustment factor results in LIDT values of 0.45 J/cm2 for the BB1-E01 broadband mirror and 1.6 J/cm2 for the Nd:YAG laser line mirror, which are to be compared with the 0.7 J/cm2 maximum energy density of the beam. While the broadband mirror would likely be damaged by the laser, the more specialized laser line mirror is appropriate for use with this system.
Pulsed Nanosecond Laser Example: Scaling for Different Wavelengths
Suppose that a pulsed laser system emits 10 ns pulses at 2.5 Hz, each with 100 mJ of energy at 1064 nm in a 16 mm diameter beam (1/e2) that must be attenuated with a neutral density filter. For a Gaussian output, these specifications result in a maximum energy density of 0.1 J/cm2. The damage threshold of an NDUV10A Ø25 mm, OD 1.0, reflective neutral density filter is 0.05 J/cm2 for 10 ns pulses at 355 nm, while the damage threshold of the similar NE10A absorptive filter is 10 J/cm2 for 10 ns pulses at 532 nm. As described on the previous tab, the LIDT value of an optic scales with the square root of the wavelength in the nanosecond pulse regime:

This scaling gives adjusted LIDT values of 0.08 J/cm2 for the reflective filter and 14 J/cm2 for the absorptive filter. In this case, the absorptive filter is the best choice in order to avoid optical damage.
Pulsed Microsecond Laser Example
Consider a laser system that produces 1 µs pulses, each containing 150 µJ of energy at a repetition rate of 50 kHz, resulting in a relatively high duty cycle of 5%. This system falls somewhere between the regimes of CW and pulsed laser induced damage, and could potentially damage an optic by mechanisms associated with either regime. As a result, both CW and pulsed LIDT values must be compared to the properties of the laser system to ensure safe operation.
If this relatively long-pulse laser emits a Gaussian 12.7 mm diameter beam (1/e2) at 980 nm, then the resulting output has a linear power density of 5.9 W/cm and an energy density of 1.2 x 10⁻⁴ J/cm2 per pulse. This can be compared to the LIDT values for a WPQ10E-980 polymer zero-order quarter-wave plate, which are 5 W/cm for CW radiation at 810 nm and 5 J/cm2 for a 10 ns pulse at 810 nm. As before, the CW LIDT of the optic scales linearly with the laser wavelength, resulting in an adjusted CW value of 6 W/cm at 980 nm. On the other hand, the pulsed LIDT scales with the square root of the laser wavelength and the square root of the pulse duration, resulting in an adjusted value of 55 J/cm2 for a 1 µs pulse at 980 nm. The pulsed LIDT of the optic is significantly greater than the energy density of the laser pulse, so individual pulses will not damage the wave plate. However, the large average linear power density of the laser system may cause thermal damage to the optic, much like a high-power CW beam.
GRATINGS TUTORIAL
Diffraction Gratings Tutorial
- Introduction
- Blazed (Ruled) Gratings
- Volume Phase Holographic Transmission Gratings
- Holographic Reflective Gratings
Introduction
Diffraction gratings, either transmissive or reflective, can separate different wavelengths of light using a repetitive structure embedded within the grating. The structure affects the amplitude and/or phase of the incident wave, causing interference in the output wave. In the transmissive case, the repetitive structure can be thought of as many tightly spaced, thin slits. Solving for the irradiance as a function wavelength and position of this multi-slit situation, we get a general expression that can be applied to all diffractive gratings when = 0°,

(1)
known as the grating equation. The equation states that a diffraction grating with spacing will deflect light at discrete angles (
), dependent upon the value
λ, where
is the order of principal maxima. The diffracted angle,
, is the output angle as measured from the surface normal of the diffraction grating. It is easily observed from Eq. 1 that for a given order
, different wavelengths of light will exit the grating at different angles. For white light sources, this corresponds to a continuous, angle-dependent spectrum.
Figure 1. Transmission Grating
Transmission Gratings
One popular style of grating is the transmission grating. The sample diffraction grating with surfaces grooves shown in Figure 1 is created by scratching or etching a transparent substrate with a repetitive series of narrow-width grooves separated by distance . This creates areas where light can scatter.
The incident light impinges on the grating at an angle , as measured from the surface normal. The light of order
exiting the grating leaves at an angle of
, relative to the surface normal. Utilizing some geometric conversions and the general grating expression (Eq. 1) an expression for the transmissive diffraction grating can be found:

(2)
where both and
are positive if the incident and diffracted beams are on opposite sides of the grating surface normal, as illustrated in the example in Figure 1. If they are on the same side of the grating normal,
must then be considered negative.
Figure 2. Reflective Grating
Reflective Gratings
Another very common diffractive optic is the reflective grating. A reflective grating is traditionally made by depositing a metallic coating on an optic and ruling parallel grooves in the surface. Reflective gratings can also be made of epoxy and/or plastic imprints from a master copy. In all cases, light is reflected off of the ruled surface at different angles corresponding to different orders and wavelengths. An example of a reflective grating is shown in Figure 2. Using a similar geometric setup as above, the grating equation for reflective gratings can be found:

(3)
where is positive and
is negative if the incident and diffracted beams are on opposite sides of the grating surface normal, as illustrated in the example in Figure 2. If the beams are on the same side of the grating normal, then both angles are considered positive.
Both the reflective and transmission gratings suffer from the fact that the zeroth order mode contains no diffraction pattern and appears as a surface reflection or transmission, respectively. Solving Eq. 2 for this condition, =
, we find the only solution to be
=0, independent of wavelength or diffraction grating spacing. At this condition, no wavelength-dependent information can be obtained, and all the light is lost to surface reflection or transmission.
This issue can be resolved by creating a repeating surface pattern, which produces a different surface reflection geometry. Diffraction gratings of this type are commonly referred to as blazed (or ruled) gratings. More information about this can be found in the section below.
Blazed (Ruled) Gratings
Figure 4. Blazed Grating, 0th Order Reflection
Figure 3. Blazed Grating Geometry
The blazed grating, also known as the echelette grating, is a specific form of reflective or transmission diffraction grating designed to produce the maximum grating efficiency in a specific diffraction order. This means that the majority of the optical power will be in the designed diffraction order while minimizing power lost to other orders (particularly the zeroth). Due to this design, a blazed grating operates at a specific wavelength, known as the blaze wavelength.
The blaze wavelength is one of the three main characteristics of the blazed grating. The other two, shown in Figure 3, are , the groove or facet spacing, and
, the blaze angle. The blaze angle
is the angle between the surface structure and the surface parallel. It is also the angle between the surface normal and the facet normal. Note that Figure 3 also defines the direction of the "blaze arrow"; this arrow is visibly marked on one edge of all Thorlabs' blazed transmission gratings.
The blazed grating features geometries similar to the transmission and reflection gratings discussed thus far; the incident angle () and
th order reflection angles (
) are determined from the surface normal of the grating. However, the significant difference is the specular reflection geometry is dependent on the blaze angle,
, and NOT the grating surface normal. This results in the ability to change the diffraction efficiency by only changing the blaze angle of the diffraction grating.
The 0th order reflection from a blazed grating is shown in Figure 4. The incident light at angle is reflected at
for
= 0. From Eq. 3, the only solution is
= –
. This is analogous to specular reflection from a flat surface.
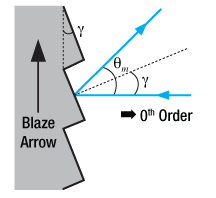
Figure 6. Blazed Grating, Incident Light Normal to Grating Surface
Figure 5. Blazed Grating, Specular Reflection from Facet
The specular reflection from the blazed grating is different from the flat surface due to the surface structure, as shown in Figure 5. The specular reflection, , from a blazed grating occurs at the blaze angle geometry. This angle is defined as being negative if it is on the same side of the grating surface normal as
. Performing some simple geometric conversions, one finds that

(4)
Figure 6 illustrates the specific case where = 0°, hence the incident light beam is perpendicular to the grating surface. In this case, the 0th order reflection also lies at 0°. Utilizing Eqs. 3 and 4, we can find the grating equation at twice the blaze angle:

(5)
Littrow Configuration for Reflective Gratings
The Littrow configuration refers to a specific geometry for blazed gratings and plays an important role in monochromators and spectrometers. It is the angle at which the grating efficiency is the highest. In this configuration, the angle of incidence of the incoming and diffracted light are the same,
=
, and
> 0 so

(6)
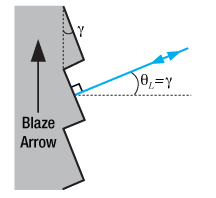
Figure 7. Littrow Configuration
The Littrow configuration angle, , is dependent on the most intense order (
= 1), the design wavelength,
, and the grating spacing
. It is easily shown that the Littrow configuration angle,
, is equal to the blaze angle,
, at the design wavelength. The Littrow / blaze angles for all Thorlabs' Blazed Gratings can be found in the grating specs tables.

(7)
It is easily observed that the wavelength dependent angular separation increases as the diffracted order increases for light of normal incidence (for = 0°,
increases as
increases). There are two main drawbacks for using a higher order diffraction pattern over a low order one: (1) a decrease in efficiency at higher orders and (2) a decrease in the free spectral range,
![]() , defined as:
, defined as:

(8)
where is the central wavelength, and
is the order.
The first issue with using higher order diffraction patterns is solved by using an Echelle grating, which is a special type of ruled diffraction grating with an extremely high blaze angle and relatively low groove density. The high blaze angle is well suited for concentrating the energy in the higher order diffraction modes. The second issue is solved by using another optical element: grating, dispersive prism, or other dispersive optic, to sort the wavelengths/orders after the Echelle grating.
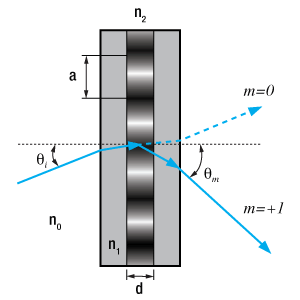
Figure 8. Volume Phase Holographic Grating
Volume Phase Holographic Transmission Gratings
Unlike traditional gratings, volume phase holographic (VPH) gratings do not have surface grooves. Instead, VPH gratings consist of a dichromated gelatin (DCG) film between two glass substrates. These VPH gratings are designed to reduce the periodic errors that can occur in blazed gratings. Surface gratings with high groove density also have an issue with polarization dependent loss. These unique transmission gratings deliver high first-order diffraction peak efficiency, low polarization dependence, and uniform performance over broad bandwidths.
The desired grating pattern is comprised of a repetitive series of lines separated by distance . The fringe planes for transmission gratings are perpendicular to the plane of the plate as seen in Figure 8, allowing any frequency of light to pass through the plate. Diffraction occurs as incoming light crosses through the DCG film. Therefore, the three major factors that determine performance are film thickness, bulk index (the average index of refraction between Bragg planes), and index modulation (the difference of index of refraction between the Bragg planes). The incident light enters the grating at an angle of
, as measured from the surface normal. The light of order
exiting the grating leaves at an angle of
, relative to the surface normal. The grating expression mentioned above can be used to calculate diffraction angles for volume phase holographic gratings since dispersion is based on the line density. The quality of the grating is determined by the fringe contrast, with a poor fringe contrast resulting in low efficiency or no grating at all.
The DCG film is taken through multiple quality control steps to ensure it performs up to standard and then cut into the desired size. The film is sealed between two glass covers to prevent degradation of the material. Since the DCG film is contained between two glass substrates, VPH gratings have high durability and long lifetimes, as well as easy maintenance compared to other gratings that can be easily damaged.
Figure 9. Holographic Grating
Holographic Surface Reflective Gratings
While blazed gratings offer extremely high efficiencies at the design wavelength, they suffer from periodic errors, such as ghosting, and relatively high amounts of scattered light, which could negatively affect sensitive measurements. Holographic gratings are designed specially to reduce or eliminate these errors. The drawback of holographic gratings compared to blazed gratings is reduced efficiency.
Holographic gratings are made from master gratings by similar processes to the ruled grating. The master holographic gratings are typically made by exposing photosensitive material to two interfering laser beams. The interference pattern is exposed in a periodic pattern on the surface, which can then be physically or chemically treated to expose a sinusoidal surface pattern. An example of a holographic grating is shown in Figure 9.
Please note that dispersion is based solely on the number of grooves per mm and not the shape of the grooves. Hence, the same grating equation can be used to calculate angles for holographic as well as ruled blazed gratings.
GRATINGS GUIDE
Transmission Gratings
Thorlabs offers two types of transmission gratings: ruled and volume phase holographic. The ruled transmission gratings are created by scratching or etching a transparent substrate with a repetitive, parallel structure, creating areas where light can scatter. These gratings have a sawtooth diffraction profile and are made of epoxy and/or plastic imprints from a master copy, in a process called replication. Our volume phase holographic diffraction gratings consist of a dichromated gelatin (DCG) film between two glass substrates. These gratings have a sinusoidal wave diffraction pattern written on the DCG film using a laser setup. For more information, please refer to the Gratings Tutorial tab.
| Ruled Diffraction Gratings | ||
|---|---|---|
 |
UV | Thorlabs' ruled transmission gratings disperse incident light on the opposite side of the grating at a fixed angle. They are ruled and blazed for optimum efficiency in their respective wavelength range, are relatively polarization insensitive, and have an efficiency comparable to that of a reflection grating optimized for the same wavelength. They are ideal for applications that require fixed gratings such as spectrographs. |
| Visible | ||
| Near IR | ||
| UV Ruled Transmission Blazed Diffraction Gratings |
|---|
| Visible Ruled Transmission Blazed Diffraction Gratings |
|---|
| NIR Ruled Transmission Blazed Diffraction Gratings |
|---|
| Volume Phase Holographic Diffraction Gratings | |||
|---|---|---|---|
 |
Volume Phase Holographic | Thorlabs' volume phase holographic (VPH) gratings consist of a DCG film between two glass substrates. These unique transmission gratings are easy to maintain and deliver high first-order diffraction peak efficiency and uniform performance over broad bandwidths. | |
| Visible VPH Transmission Gratings |
|---|
| NIR VPH Transmission Gratings |
|---|
Reflective Gratings
Reflective grating master copies are made by depositing a metallic coating on an optic and ruling parallel grooves in the surface. Thorlabs' reflective gratings are made of epoxy and/or plastic imprints from a master copy, in a process called replication. In all cases, light is reflected off of the ruled surface at different angles corresponding to different orders and wavelengths. All of Thorlabs' ruled reflective diffraction gratings exhibit a sawtooth profile, also known as blazed, while our reflective holographic diffraction gratings exhibit a sinusoidal profile. For more information, please refer to the Gratings Tutorial tab.
| Ruled Diffraction Gratings | ||
|---|---|---|
 |
UV | Ruled gratings can achieve higher efficiencies than holographic gratings due to their blaze angles. They are ideal for applications centered near the blaze wavelength. Thorlabs offers replicated ruled diffraction gratings in a variety of sizes and blaze angles. |
| Visible | ||
| Near IR | ||
| Mid IR | ||
| UV Ruled Reflective Blazed Diffraction Gratings |
|---|
| Visible Ruled Reflective Blazed Diffraction Gratings |
|---|
| Near-IR Ruled Reflective Blazed Diffraction Gratings |
|---|
| Mid-IR Ruled Reflective Blazed Diffraction Gratings |
|---|
| Holographic Diffraction Gratings | |||
|---|---|---|---|
 |
Holographic | Holographic gratings have a low occurrence of periodic errors, which results in limited ghosting, unlike ruled gratings. The low stray light of these gratings makes them ideal for applications where the signal-to-noise ratio is critical, such as Raman Spectroscopy. | |
| Reflective Holographic Sinusoidal Diffraction Gratings |
|---|
| Echelle Diffraction Gratings | |||
|---|---|---|---|
 |
Echelle | Echelle gratings are low period gratings designed for use in high diffraction orders. They are generally used with a second grating or prism to separate overlapping diffracted orders. They are ideal for applications such as high-resolution spectroscopy. | |
| Echelle Ruled Blazed Diffraction Gratings |
|---|
Selecting a grating requires consideration of a number of factors, some of which are listed below:
Efficiency:
Ruled gratings generally have a higher efficiency than holographic gratings. Holographic grating tend to have a lower efficiency but a broader effective wavelength range. The efficiency of ruled gratings may be desirable in applications such as fluorescence excitation and other radiation-induced reactions.
Blaze Wavelength:
Ruled gratings have a sawtooth groove profile created by sequentially etching the surface of the grating substrate. As a result, they have a sharp peak efficiency around their blaze wavelength. Holographic gratings are harder to blaze, and tend to have a sinusoidal groove profile resulting in a less intense peak around the design wavelength. Applications centered around a narrow wavelength range could benefit from a ruled grating blazed at that wavelength.
Stray Light:
Due to a difference in how the grooves are made, holographic gratings have less stray light than ruled gratings. The grooves on a ruled grating are machined one at a time which results in a higher frequency of errors. Holographic gratings are made through a lithographic process, which generally creates smoother grating masters free of tool marks. Replicants made from these masters exhibit less stray light. Applications such as Raman spectroscopy, where signal-to-noise is critical, can benefit from the limited stray light of the holographic grating.
Resolving Power:
The resolving power of a grating is a measure of its ability to spatially separate two wavelengths. It is determined by applying the Rayleigh criteria to the diffraction maxima; two wavelengths are resolvable when the maxima of one wavelength coincides with the minima of the second wavelength. The chromatic resolving power (R) is defined by R = λ/Δλ = n*N, where Δλ is the resolvable wavelength difference, n is the diffraction order, and N is the number of grooves illuminated. Due to their low groove density, Echelle gratings provide high resolving power.
Polarization Dependence:
Surface gratings that have high groove densities also have an issue with polarization dependent loss, often with significantly lower efficiency when exposed to parallel- versus perpendicularly-polarized light. Volume phase holographic gratings are designed for applications that require low polarization dependent loss at higher spatial frequencies.
For further information about gratings and selecting the grating right for your application, please visit our Gratings Tutorial.
Caution for Gratings with Surface Grooves:
The surface of a diffraction grating with surface grooves can be easily damaged by fingerprints, aerosols, moisture or the slightest contact with any abrasive material. Gratings should only be handled when necessary and always held by the sides. Latex gloves or a similar protective covering should be worn to prevent oil from fingers from reaching the grating surface. Solvents will likely damage the grating's surface. No attempt should be made to clean a grating other than blowing off dust with clean, dry air or nitrogen. Scratches or other minor cosmetic imperfections on the surface of a grating do not usually affect performance and are not considered defects. Conversely, volume phase holographic gratings can be cleaned using standard optics cleaning procedures and have high durability.
Echelle Gratings

| Item # | Groovesa (lines/mm) | Blaze Angle | Wavelength Range | Dispersion (nm/mrad) | Size |
|---|---|---|---|---|---|
| GE2550-0363 | 31.6 | 63° | UV - 57 µm | 14.37 | 25.0 mm x 50.0 mm x 9.5 mm (0.98" x 1.97" x 0.37") |
| GE2550-0863 | 79.0 | 63° | UV - 23 µm | 5.75 | |
| GE2550-0875 | 79.0 | 75° | UV - 25 µm | 3.28 | |
| GE2550-3263 | 316 | 63° | UV - 5.7 µm | 1.44 |
Part Number | Description | Price | Availability |
|---|---|---|---|
GE2550-0363 | Echelle Grating, 31.6 Grooves/mm, 63° Blaze, 25 mm x 50 mm x 9.5 mm | $260.15 | 3-5 Days |
GE2550-0863 | Echelle Grating, 79.0 Grooves/mm, 63° Blaze, 25 mm x 50 mm x 9.5 mm | $260.15 | 3-5 Days |
GE2550-0875 | Echelle Grating, 79.0 Grooves/mm, 75° Blaze, 25 mm x 50 mm x 9.5 mm | $260.15 | 3-5 Days |
GE2550-3263 | Echelle Grating, 316 Grooves/mm, 63° Blaze, 25 mm x 50 mm x 9.5 mm | $260.15 | 3-5 Days |

