Threading Specifications
The following is a general overview of screw threading. For more details regarding specifications and dimensions, please consult the Machinery's Handbook, available for purchase at many bookstores.
Features of a Thread
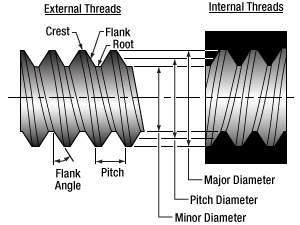
A thread consists of three repeating features: a crest, flank, and root (see drawing to the right). Except in special cases, threads have symmetrical sides inclined at equal angles when a vertical line is drawn through the center of a crest or root. The distance between corresponding points on adjacent threads is known as the pitch of the thread. The flank angle is defined as the angle the flank makes with a perpendicular ray drawn from the screw axis. Unless otherwise stated, threads have a flank angle of 30°, resulting in a total angle between flanks of 60°. Each feature is shown in the diagram to the right.
The major diameter is taken from the crests of a thread while the minor diameter is taken from the roots. For most screws, crests and roots do not terminate at a sharp point, so crest and root truncation values are included in the definitions of major and minor diameter. The pitch diameter is approximately halfway between the major and minor diameters.
Thread Form
A thread form is a set of rules that define the features' scale relative to one another. Common thread forms include the Unified Screw Thread Form, used in the United States of America and measured in imperial units, and the ISO Metric Screw Thread Form, used in many parts of the world and measured with the International System of Units. There are many thread forms in the Unified screw thread standard designated by either UN, which defines a flat root contour, or UNR, which defines a round root contour. These can be further described by appending more letters. For example, an extremely fine thread with a flat root contour is designated UNEF. Those forms which are not standardized by the Unified screw thread system are designated UNS.
Thread Series
Most screws are identified by their thread series. Thread series are denoted by the major diameter and density of threads. Unified threads specify density in threads per inch, while Metric threads specify the thread pitch. For example, in the Unified nomenclature, a 1/4"-20 cap screw has a 1/4" diameter barrel and the pitch is 20 threads per inch (TPI). In metric nomenclature, an M4 x 0.7 cap screw has a 4 mm barrel and the pitch is 1 thread per 0.7 mm. The term M4 x 0.7 is often shortened to just M4.
| Unified Thread Class Tolerancing |
| Location |
Loose |
Optimal |
Strict |
| Internal |
1B |
2B |
3B |
| External |
1A |
2A |
3A |
| Metric Thread Tolerance Positions |
| Location |
Loose |
Optimal |
Strict |
| Internal |
- |
G |
H |
| External |
e or f |
g |
h |
| Metric Thread Tolerance Grades |
| Dimension |
Location |
Tolerance Gradesa |
| Minor Diameter |
Internal |
4, 5, 6, 7, 8 |
| Major Diameter |
External |
4, 6, 8 |
| Pitch Diameter |
Internal |
4, 5, 6, 7, 8 |
| External |
3, 4, 5, 6, 7, 8, 9 |
Thread Class
The tolerances and allowances on a thread series are given by a thread class. Unified thread classes are alphanumeric identifiers starting with a number from 1 through 3, where 1 is the loosest tolerance and 3 is the tightest, and either A for external threading or B for internal threading.
Metric threads have a slightly more complex tolerancing method that uses tolerancing grades, designated by a number 3 through 9; and tolerancing positions, which use letters e through h. Grades provide a measure of the tolerance itself: the smaller the number, the tighter the tolerance. Positions denote the distance of the tolerance from the pitch diameter. Uppercase positioning letters indicate internal threads while lowercase positioning letters indicate external threads.
Quoting from the Machinery's Handbook, 29th Edition, p. 1885: "To designate the tolerance class, the grade and position of the pitch diameter is shown first followed by that for the major diameter in the case of the external thread or that for the minor diameter in the case of the internal thread, thus 4g6g for an external thread and 5H6H for an internal thread. If the two grades and positions are identical, it is not necessary to repeat the symbols, thus 4g, alone, stands for 4g4g and 5H, alone, stands for 5H5H."
Thorlabs' SM Series Threads
Threading specifications for our SM threads, utilized in our lens tube and cage system components, are given below so that you can machine mating components to suit your application. Most SM series threads utilize a non-standard Unified thread form, indicated by the letters UNS, with a 30° flank angle and a thread class of 2A and 2B. The exception is our SM30 series thread, which is a Metric thread form with a 30° flank angle and a tolerance of 6H/6g. We also offer products with C-Mount and RMS threads, and the specifications for these threads are given below for reference. Please note that other manufacturers may have different tolerances for C-Mount and RMS threads. For other thread specifications that are not listed here, please contact Tech Support.


 Products Home


 Adjustable Ø3" Lens Tubes